Tips for Mastering Anatomy

Human gross anatomy is one of the first major rites of passage that medical students undergo on the way to becoming physicians. I won’t talk much about the emotional experience of it here, but let me just say that it is life changing and a true honor to experience. As you go through it, though, it can be easy to become desensitized to the emotion that is elicited by dissecting a human body, especially when there’s hundreds of structures to identify and ingrain in your memory. It is this sheer volume of information to learn that makes anatomy one of the hardest classes in the first year of medical school.

But I didn’t think it was that bad.

I did, however, have one advantage over many of my classmates – I had actually taught anatomy to undergrads (as a teaching assistant) and was currently teaching the class again as I went through my M1 anatomy course. I had learned alongside my undergraduate students as they studied the bones and their markings, muscles (their origins, insertions, actions, and innervations), and nerves – I had not taken anatomy before teaching it! While my knowledge of anatomy was not that great even after teaching (and was limited to those three systems), I did come away with a better understanding of how to effectively study for anatomy, and that made all the difference. Because of that, I would like to share some of my tips – both for medical students and my undergraduates – to help you all master anatomy!


Use the right resources

Your professor will likely assign a textbook for the class. We had Grey’s Anatomy for Students, which was helpful because it had an overview section in the beginning of each chapter that was a good place to start (and usually all that I read if I read the book at all). The book also has highlighted clinical correlations that were particularly good review for the written exam. It was also suggested (but not recommended) that we purchase an atlas, which I didn’t do until after the first semester (Netter’s Atlas of Human Anatomy is the shit). We had them available in lab, but it was incredibly helpful to have at home as well. While nothing can replace studying on actual cadavers (or models if your class also uses those), looking at images can be a good place to start/a good reference for clarification while/after looking at bodies/models/a good last minute review before the exam.

Another resource that is helpful is actually Wikipedia. While teachers 99.9% of the time tell you to never use Wikipedia (the information is unreliable, etc.), anatomy is the 0.1% of the time when it is an acceptable resource. My professor told us that anatomists have done a good job at maintaining the accuracy of these pages (though it is always important to cross check the information with your textbook/lecture notes, especially if your grading is strict like in the class I TA). Therefore, I mostly used Wikipedia for my information. I liked it because I could find out everything I needed (and then some) about a structure easily – I tend to learn things best by learning too much/putting it in greater context.

Make Connections

Nothing in the body exists in isolation. The most important part of anatomy is not just being able to identify individual structures but being able to understand their relations to each other. Learn to see how things are connected, whether through a direct interaction (this nerve innervates this muscle and thus runs along it) or indirect (this muscle lies next to this other muscle, and they are both innervated by the same nerve). By making these connections, you can reduce the number of pieces of information that you need to learn.

Spend time in lab wisely

The most important part of this first is that you NEED TO SPEND TIME IN LAB. I simply cannot emphasize that enough. I could definitely see a difference in scores between those students who came in extra times to lab to learn the material and those who did not. Anatomy is a highly visual and tactile subject. You need to see the muscles/arteries/nerves/etc. and understand where they are in relation to other structures. While Netter’s and other anatomy text books have pretty looking pictures, they cannot do the real human body justice. You need to look at both your body as well as other bodies in the lab since you’re likely going to be tested on all of them (see point #3 in my Almost Doc’s article 5 Precise Techniques to Become to Most Effective Learner Ever). No two bodies look exactly alike, and it is important to truly appreciate that.

You also need to spend your time in lab WISELY. My undergrad students are required to be in lab for 1.5 hours each class, most of that time being free time for them to learn from models/cadavers/etc. as they see best. But many of them would spend that time talking to friends (not about anatomy), working on things for other classes, sleeping, texting/facebooking/online shopping, or doing something else totally unrelated to class. Others would spend time superficially going through the bigger (and easier) items to learn, usually while looking up information online/in the text book. Very few would be actually using the models that they would be tested on (though they did spend a decent amount of time with the cadavers). Yet before every exam someone would ask for more time in lab to study. Had they come to lab with a plan and used their time to study things that they couldn’t study at home (such as looking at the models and cadavers that they would be tested on), they wouldn’t feel that they need any extra time.

The same idea of wisely using your time applies to M1 anatomy. Come to lab during the extra hours with an idea of what you want to study. My recommendation – start with the things you know the least. Everyone wants a confidence booster by going through the things they know the best, but that is low hanging fruit. To make the biggest leap in your understanding, you need to focus on increasing knowledge in areas that you understand the least (see the personalize section in my blog post Study Tips for the MCAT (More on How I Prepared in a Month)). For me this was usually arteries and nerves – they can be hard to differentiate, there’s lots of branching – so I would try to start with these areas that I knew the least and try to go through the whole structure list for those areas before moving on to topics that I was more comfortable with.


Have a study buddy

One of the best things that I did was study with other people. I was fortunate to be placed with a great dissection group of super intelligent human beings who were both fun and hard working – the perfect study buddies. We were thorough during our scheduled dissection times (usually using the whole time if not going longer) and often some of us would meet up at other times to go over our dissections. I’m not one to study with other people, but in anatomy this was essential.

Screen Shot 2016-08-11 at 11.07.24 AM.png
The best anatomy group ever.

The benefits of studying with others are many. First of all, they can help you flip a body if need be (something I tried to avoid at all costs). Second, they probably know things that you don’t know and vice versa. We would usually go through our structure list and take turns teaching each other/quizzing each other. By reading a term, saying it out loud, identifying it on a body, and having confirmation from another person, you are giving yourself more opportunities to have that information ingrained in your memory. Also, not knowing a term, being quizzed on it, and having someone explain it helps you learn from being wrong/not knowing. Of course, working together to figure out something neither of you know is also quite helpful (make sure to have text books/atlases available to reference while in lab).

Perhaps one of my favorite benefits of studying with others is learning how they remembered a structure. We all hear different mnemonics that can help us learn. Sometimes it’s not a mnemonic but rather an interesting connection/observation that stands out to remember a term. One of my favorite examples of this is the transverse cervical artery that runs vertically just deep to the trapezius muscle. When the trapezius muscle is dissected, it can be flipped to the side to see underlying structures, including the artery. Thus the artery, which goes with the muscle, appears to be running in the transverse plane of the body. One of my lab mates excitedly pointed this out, and even though the artery doesn’t run in the transverse plane when placed in anatomical position, I always remembered the name of the artery that lies under the trapezius because of this discussion.


Make your own study guides

I’m a big fan of making my own study guides. I do this not only for anatomy but many of my other classes as well. Everyone learns information a little differently and by making your own study guide, you can display this information in the way that makes the best sense for you to remember it. Also, simply the act of writing things down is helpful for memorization (which is why I HIGHLY RECOMMEND doing this especially for learning the CORRECT SPELLING of these terms, which is often a component of your grade). For anatomy, I would go through my whole structure list and make study guides based on the topic for all of the structures. By doing so, I learned a couple of very useful techniques to make the most effective study guides that I describe below.

Use tables

I never appreciated tables until I took anatomy. As an example of how I used tables, see the image below:

Screen Shot 2016-08-10 at 12.20.38 PM

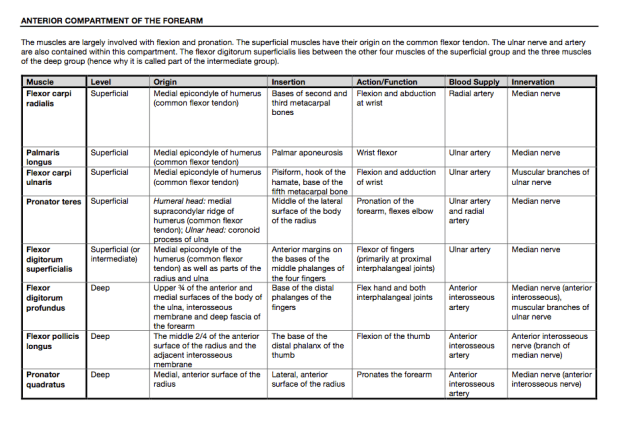
This is the table I used to learn the muscles in the anterior compartment of the forearm (a connection between these 8 muscles). For most of my muscle tables, I only included the origin, insertion, action/function, blood supply, and innervation. However, I also included level (superficial vs. deep) to understand the relative location of these muscles since there are so many in this compartment (and I listed them superficial to deep). Having all of this information in a table is helpful to see the connections between structures. For example, you can see that the three muscles listed as being “deep” are also supplied by the anterior interosseous artery while those being “superficial” are supplied by the ulnar artery. This also hints at the location of these arteries. You can also see that the three superficial wrist flexors all have their origin at the medial epicondyle of the humerus.

Screen Shot 2016-08-10 at 12.27.14 PM.png

I also made tables for other topics such as nerves that I didn’t necessarily need to have multiple columns like for muscles. However, I made the table as a replacement for writing out notecards (since writing that much would take forever and would destroy my hand). Though writing  by hand has been shown to be better than typing for retention, I tried to do things like emphasizing parts my writing (see the bolded words to emphasize a connection to another term, other times I used all capital letters, italics, or underlines to emphasize different things). By having changes in formatting, I was able to have important parts of what I wrote come across easier.

Make a list

One of the biggest revelations I made when making study guides was how to learn the branching pattern of nerves and arteries. Initially, I would make a table for these (like I did for muscles) that included source and branches. But then I figured out to make things like this:

Screen Shot 2016-08-10 at 12.33.23 PM.png

This may just look like a list to you, but it is actually a very well thought out list that gives away much more than just the structure names. The terms are listed in order of how they are found – proximal to distal. Each indentation indicates that the artery is a branch of the artery above it. For example, if you wanted to know how the common interosseous artery in the forearm arose, you would be able to see that it is a branch of the ulnar artery, which is a branch of the brachial artery, which is a branch (well actually a continuation) of the axillary artery. You can also see that the common interosseous artery comes off of the ulnar artery after the posterior ulnar recurrent artery and before the anterior interosseous artery. I would bring these lists in lab to go through as I tried to identify all of these terms on the body. A major benefit is that it is concise (and usually fits on a single page) but provides a lot of information!


And that’s all of the advice I can think of at the moment! I will update with more advice as I think of it/questions arise. Otherwise, I just want to say that I hope you all enjoy anatomy as much as I do! Best of luck!

A useful resource for M3/M4!

Ever get frustrated with poor teachers? Dustyn Williams did during his time in medical school, so he combined his frustration with his passion for teaching to make a resource to help students survive the clinical years. I had the opportunity to talk with Dustyn about his website, onlinemeded.org, a little while ago and wanted to share this great resource with all of my readers!

First of all, what exactly is Online Med Ed? It started as Dustyn began making videos during M4 and residency. The website officially launched in 2014 and provides these videos for FREE. Yes, FREE. These videos don’t tell you everything about each topic, but they tell you what you need to know about a topic. As Dustyn said, he wants a student to make the right choice in the clinic to save lives. The material he provides on this website is designed to help you do that.

How is this different from medical school teaching? For example, say you were on your OB/GYN rotation and wanted to know more about contraceptives. The medical school may bring in an expert who gives a 2 hour lecture on different contraceptives and their mechanisms of action. On the other hand, Online Med Ed has a 15 minute video that is a general overview of contraceptives that focuses on what you will most commonly need to know in the clinic. Basically, it is a lot more efficient. Obviously it does not cover the material as thoroughly, but is a good starting point for learning the material.

These free videos are just the start of what is offered by Online Med Ed. They know that not everyone learns the same way, so they have expanded to providing other tools such as notes, downloadable audio, study questions, clinical cases, and flashcards (available with a premium subscription). They’re also using technology to help you use these tools most effectively. This includes a schedulizer to help plan your studying throughout your clinical rotation and reminders through the application to promote forced repetition for longer retention.

Check this out in your clinical years of med school!

Curious why my cat, Smeagol, is the featured image for this post? Check out onlinemeded.org and you’ll understand. 🙂

Fitting in a week in DC

[Insert usual “sorry I haven’t written in a while” statement here. #mdphdproblems]

As a MD/PhD student, I consider myself a master at fitting as many things into my schedule as possible. This week is no different. It is the final week of exams for the M1 class, and since I am an eternal M1 while completing my PhD, it is also exam week for me. Luckily, one of the M1 classes I opted to take this year ended in March and the other class I took this semester is anatomy, which had its final written and practical exams earlier today. I left Illinois soon after my practical exam and am now writing this in Washington, DC!

Why Washington, DC? I’m here to attend the American College of Physicians’ Leadership Day and Internal Medicine Meeting. The American College of Physicians (ACP) is the largest medical specialty group in the United States with 137,000+ members. As an aspiring oncologist (we’ll see if this changes once I reach my clinical years), I must first specialize in internal medicine, which is essentially medicine focused on adults. I have also been involved in my school’s internal medicine interest group since starting my MD/PhD program and know that it is the specialty that interests me the most. So naturally, if I had the opportunity to attend an ACP event, I would take it.

The Leadership Day is actually a two-day event, which focuses on educating attendees on policy changes that would benefit the practice of internal medicine (and most importantly patients!) and then giving representatives from each state the opportunity to meet with congressional staff to discuss these proposed policies. This is not my first Leadership Day. I attended two years ago (see my blog post). As I read over the material provided by ACP to prepare for this event, I was stricken by the difference in focus from two years ago. To illustrate these changes, here are the key policies from 2014 and 2016:

2014

  • Eliminating the SGR (sustainable growth rate), a formula for physician payment
  • Extending Medicaid payment policy for primary care services
  • Medical liability “safe harbor” legislation and pilot health courts
  • Graduate Medical Education (GME) financing
  • Sufficient funding for federal health care workforce programs

2016

  • Improving care of patients with chronic disease
  • Improving health information technology
  • Improving telemedicine
  • Integrating behavioral health into primary care
  • Stemming the increase in opioid abuse
  • Addressing the rising cost of prescription drugs
  • GME financing

One of the biggest differences I noticed right away is that the focus in 2014 was much more on paying for medical services – mainly via repealing SGR and extending Medicaid payment policy – while 2016 is much more focused on promoting certain areas of improvement – such as chronic disease, behavioral health, opioid abuse and prescription drugs, and medical technology. Of course some things stay the same, mainly the need to increase the number of physicians going through GME.

One reason for this change is that the SGR was finally repealed in 2015! The SGR was enacted by the Balanced Budget Act of 1997 (which also limited the amount of GME spots funded by the government) and has been a problem for quite a while. Basically, it was like a rollover system like some cell phone plans – don’t use all of your minutes in the month? They’ll carry on to the next month – except for it was for how physicians get paid by Medicare. The problem is the converse, however, such that if the expense one year was too high, the payment to physicians was proportionally decreased the following year, which likely made some physicians not want to care for Medicare patients.

I still have a lot to learn about healthcare policies, but I am so glad to have the opportunity as a medical student to get a taste of advocacy. No matter your skill as a doctor, systemic hurdles may still make it difficult for you to offer help to the patients who need it the most. That’s why I think it is so important to make our voices heard in the realm of policy and why I’m attending this Leadership Day.

In addition to the Leadership Day, I am also attending the Internal Medicine Meeting, ACP’s national meeting, where I am presenting a poster on one of my projects looking at how the scaffolding protein I study protects the liver against damage. Just from carrying my poster through the airport it has given me the opportunity to tell non-scientists about the importance of the liver and health in general. Looking forward to the week!

I’m now a Master

Masters

So, in my little absence from blogging, I went out and got my masters degree. Cool, right? While I was officially notified that I would be awarded my degree in May and technically “graduated” in August, I didn’t get this fancy piece of paper until mid-September when I finally let everyone know. Alas, my absence from blogging made posting this a little bit less of a priority, but I’m hoping that by writing this now, I will be able to get myself back into that whole writing-for-fun (fun? yes fun) thing.

Anyways, I thought I’d explain a bit about how I earned this degree:

First of all, you may be wondering why get a masters if I’m getting a Ph.D. Yes, some people get masters before they apply to a Ph.D. program, but I’m already signed up for the long run. Fortunately, my department thinks it’s nice to award their students masters degrees after completion of the course requirements, recommendation by the advisor to continue as a Ph.D. candidate, and successful completion of written and oral Ph.D. candidacy qualification exams. The course requirements are usually completed by the time of the qualification exam in the spring of the second year.

Even though I switched labs after 8 months, which put me behind in my research, I still was able to complete this exam on time. The research aspect is important because our qual exam involves writing a research proposal based on our current work (which requires generating a sufficient amount of data) and orally defending said proposal. Fortunately, just before writing my proposal, I helped my prof write a larger NIH research proposal on my project, which I then was able to take parts of (aka the parts that I primarily wrote) and incorporate them into my proposal. It was a great experience to become more familiar with proposal writing, which helped me write mine (grad students, if you ever get a chance to do this, definitely do it!) I gave myself a month to devote myself to writing my proposal and finishing up some experiments to use as preliminary data and was pretty satisfied with the result.

Next came the oral exam. Mine was scheduled nearly a month after the deadline for the written portion. Since I felt guilty doing science and not studying, I spent most of that month sitting at home and reading every paper somewhat related to my research that I could get my hands on (and playing with my new cat, Smeagol). Let’s just say my useless science knowledge expanded exponentially during that time (sure I can draw a steroid-based bile acid in 3D and do the electron pushing for the synthesis of bile acids from cholesterol now, but that doesn’t have any relevance to my research other than that I study the biological functions of fully synthesized bile acids…) Nonetheless, my relentless studying paid off. My oral exam consisting of me and three professors in a small room with a chalkboard (no prepared presentations allowed!) went rather swimmingly. Well, other than their concern that my proposal was a bit (a lot) ambitious even though I essentially cut my prof’s proposal in 1/3…

Even though my proposal was well written and my oral exam went well, my (and my advisor’s) ambition earned me a rewrite on my proposal to make it more simple and less time consuming (so that I’d get to graduate at some point). Unfortunately, being able to write a non-ambitious proposal is a skill that must be acquired through writing lots of proposals. Since I was planning on adapting this fake qualifying exam proposal into my own actual fellowship proposal that summer, I took this rewrite as an opportunity to get even more feedback on my proposal and make it the best it can be. I turned in my rewritten proposal in May and soon found out that it had been approved. Thus, the awarding of my degree and my current status as a Ph.D. candidate. 🙂

Up next: Ph.D.

#AcademicsWithCats

If you follow me on instagram and/or twitter, you may know that just over a month ago, I adopted a sweet little 1 year old cat from the Humane Society. Since then, I’ve been 1) too busy playing with her and 2) too busy preparing for my qualifying exam (mostly #2, but I wish it were more #1) to post about her. Now that my qual is done, I’d like to finally introduce you all to my precious girl, Smeagol!

I know the name probably reminds you of this little fellow from LOTR:

Source: Dugbee | Flickr

But no worries, she is nowhere as creepy as Gollum (and luckily not possessed by a magic ring). But she is gray/brown, which fits with the name, and I’ve always wanted to name my pets after characters from middle earth.

2015-03-26 17.51.25

So why am I posting about my cat on a blog about med school and grad school? Well, a little while ago there was a hashtag going around twitter, #academicswithcats. Now that I’m one of them, I wanted to share some of my pictures of how this little cat has changed the way I work.

Working on the computer is a lot harder.

2015-03-08 11.00.49

I can’t edit my writing.

(That’s my qualifying paper).

2015-03-15 13.20.28

I can’t access the papers I’d like to read.

2015-03-23 11.41.01

But it’s totally worth it!

2015-03-30 09.25.59

If you’re looking to get a pet, please consider adoption!

Study Tips for the MCAT (More on How I Prepared in a Month)

Nearly a year ago to the day, I wrote my highly popular blog post “How I Prepared for the MCAT in Only a Month.” I wrote it with the intent to show others that the MCAT does not have to be as scary as it seems, and I’m glad it has received such a positive response! Since then, a great number of my readers have reached out to me for advice about to how to study for the MCAT. Therefore, while the test has changed since I took it, I have decided to write this follow up post to offer some more tips that will be applicable to those taking the new MCAT as well as anyone facing a big exam. Within this post, I will cover my general strategy for studying – plan, practice, and personalize – as well as address some general concerns about the exam.

Plan, Practice, and Personalize

Plan

The MCAT covers an overwhelming amount of information. This makes it difficult to even determine where to begin. Whether you have 4 weeks or 4 months to prepare for the exam, it is best to start by sitting down, looking at your schedule, and planning realistic checkpoints for your progress. When I planned, I set aside the first half to cover all of the information necessary (with equal time devoted to each section) and the second half to polish up my knowledge and testing skills. This last part is the most important – knowing the information is important but being able to apply it in a testing situation is just as important.

Practice

This is that important part that I just mentioned. You need to do practice problems and then keep doing practice problems. As I’ve written about in my Almost Docs article 5 Precise Techniques to Become the Most Effective Learner Ever, it is important to study in the format of the exam – i.e. if you were taking an exam with free response questions, then you should prepare by doing free response questions. Since the MCAT is a multiple-choice exam, you should prepare by doing multiple-choice questions.  There is a great deal of practice exams available for the MCAT. Make sure to check them out.

On top of that, do these problems over and over. Another point made in my article is that you need to learn, forget, and relearn the material to better retain the information. Therefore, doing practice exams with enough time between to forget the questions will help you get even more out of them (especially when you have to pay for the practice exams!)

One concern I’ve noticed is whether to do a complete practice test or do one section at a time. Mostly I’ve heard people talking about doing the former, not as much the latter, but both can have their benefits. In fact, I’m a proponent of the latter.

The MCAT is a pretty long exam (and it’s only getting longer). One its challenges is keeping focused and on top of your game throughout the entire test. If you read my previous post, you’ll have found that about halfway through all I could think about was what food I wanted to eat (oops). Doing complete practice tests can help you improve your endurance for testing to handle the mental strain for such a long period of time.

On the other hand, doing just one section at a time keeps you focused on the information covered in that section. If you’re studying biology this keeps you focused on biology, for example. This will especially come in handy for the last part of the strategy – personalize.

Personalize

Everyone has their own strengths and weaknesses, and it is important to identify these to make your studying most effective. I did this by thoroughly going through each practice question with an emphasis on those I got wrong or those that I got right but was unsure of my reasoning. Most practice tests have explanations for the answers given – work to understand these! I kept one word document specific for taking note of these explanations that served as a personalized high yield set of notes that I looked back at as the exam approached. By doing just one section at a time, I was able to better remember my reasoning for my answer so that I could determine if it matched that given. This also helped me figure out what areas I needed to go back and study more so that I didn’t waste time looking at subjects that I was more comfortable with.

~

While this is a general description of how to study for the MCAT, it can be applied to any section whether its verbal reasoning or physical sciences. The main point is identifying your weaknesses and putting your focus on those so that you don’t waste effort on studying your stronger subjects. This will make your preparation for the MCAT as efficient and effective as possible.

With that, grad school and med school calls! If you look back at my posts on the blog, you’ll notice that there hasn’t been one in quite a while and those two things are to blame! If you have any questions about the MCAT that would be helpful for me to address to help others, feel free to put them in the comments or send me an e-mail. Happy studies!

~

This is just the beginning!

If you like my writing, please consider following my blog. There’s a link near the top of the side bar to do so. Also, feel free to like my Facebook page, MD, Phd To Be, and follow me on Twitter, @MDPhDToBe. Any questions, comments, or requests for future blog posts can of course be directed to me from any of these locations or directly emailed to me at mdphdtobe@gmail.com. Thank you for reading!